Securely Connect Remote IoT P2P SSH Ubuntu: The Ultimate Guide For Tech Enthusiasts
Hey there, tech wizard! If you're reading this, chances are you're diving deep into the world of secure remote connections, IoT devices, and SSH on Ubuntu. Let me tell ya, securely connect remote IoT P2P SSH Ubuntu is one of those topics that can make your head spin—but don’t worry, we’ve got your back. Whether you're a seasoned pro or just starting out, this guide is packed with actionable tips, tricks, and insights to help you master this crucial tech setup. So, buckle up and let’s dive in!
Imagine this: you’ve got a bunch of IoT devices scattered across the globe, and you need to ensure they’re talking to each other securely. That’s where SSH comes in, acting as the digital bouncer that keeps the bad guys out while letting your devices communicate like old pals. But here’s the kicker—getting it right isn’t as straightforward as it seems. This guide will walk you through the process step by step so you can set up a rock-solid system without breaking a sweat.
Now, before we get into the nitty-gritty, let me emphasize something important. Securely connecting IoT devices via SSH on Ubuntu isn’t just about setting up a connection; it’s about ensuring your network remains impenetrable to cyber threats. In today’s digital landscape, where cyberattacks are as common as morning coffee, securing your IoT infrastructure is non-negotiable. So, let’s roll up our sleeves and get to work!
- Jameliz Benitez Smith Onlyfans The Ultimate Guide To Her Rise And Success
- Scott Wapner Cnbc Wife The Untold Story Behind The Man And His Partner
Understanding the Basics of IoT and SSH
Alright, let’s start with the basics. IoT, or the Internet of Things, is basically a network of physical devices that can connect and exchange data. Think smart fridges, thermostats, and even your fancy fitness tracker. SSH, on the other hand, stands for Secure Shell, and it’s a protocol that allows you to securely connect to remote devices over an unsecured network. When you combine these two, you’ve got yourself a powerful tool for managing and securing your IoT devices.
But why is securely connect remote IoT P2P SSH Ubuntu so important? Well, imagine leaving your front door unlocked in a neighborhood full of tech-savvy burglars. That’s what happens when you don’t secure your IoT devices properly. SSH acts as the digital lock that keeps the bad guys out while letting authorized users in. It’s like having a personal bodyguard for your devices, ensuring they stay safe and sound no matter where they are.
Why Use SSH for IoT Devices?
Here’s the deal: SSH is not just any protocol; it’s the gold standard when it comes to secure remote connections. By using SSH, you can:
- Unveiling The Truth Understanding Sandra Blust Nudes
- Pierre Poilievre Height And Weight A Closer Look At The Canadian Politician
- Encrypt all communication between devices, making it nearly impossible for hackers to intercept your data.
- Authenticate users and devices, ensuring only authorized parties can access your network.
- Automate tasks and manage devices remotely, saving you time and effort in the long run.
And let’s not forget the best part—SSH is open-source, meaning it’s free to use and has a massive community of developers who are constantly improving it. So, whether you’re managing a small home network or a large-scale enterprise system, SSH has got you covered.
Setting Up SSH on Ubuntu: A Step-by-Step Guide
Now that we’ve covered the basics, let’s dive into the practical stuff. Setting up SSH on Ubuntu is easier than you think, but it does require a bit of technical know-how. Follow these steps carefully, and you’ll have a secure SSH connection up and running in no time.
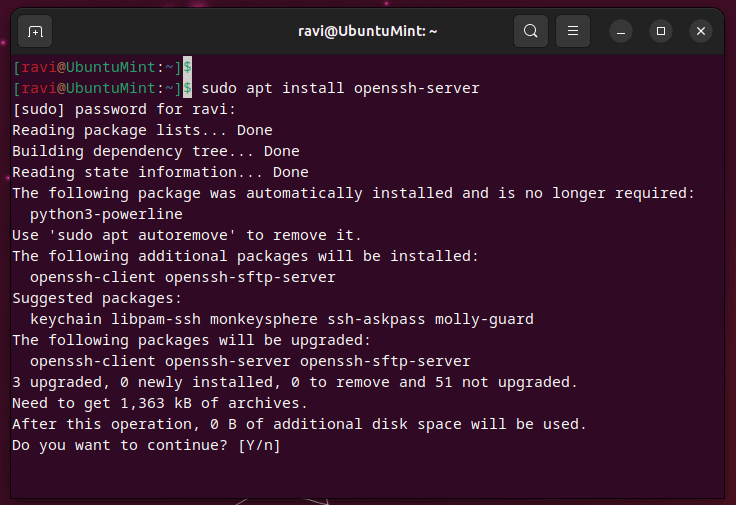
Step 1: Install SSH Server
The first thing you need to do is install the SSH server on your Ubuntu machine. Open up your terminal and type the following command:
sudo apt update && sudo apt install openssh-server
This will install the OpenSSH server on your machine, which is the software that allows you to accept incoming SSH connections. Once the installation is complete, you can check if the service is running by typing:
sudo systemctl status ssh
If everything is working correctly, you should see a message saying that the SSH service is active and running. Easy peasy, right?
Step 2: Configure SSH Settings
Now that you’ve got the SSH server installed, it’s time to configure the settings to ensure maximum security. The configuration file for SSH is located at /etc/ssh/sshd_config. Open it up using your favorite text editor:
sudo nano /etc/ssh/sshd_config
Here are some settings you should consider tweaking:
- Change the default port from 22 to something less obvious, like 2222. This makes it harder for hackers to find your SSH service.
- Disable root login by setting PermitRootLogin to no. This prevents attackers from gaining access to your system using the root account.
- Enable public key authentication by setting PubkeyAuthentication to yes. This allows you to log in using a key pair instead of a password, which is much more secure.
Once you’ve made these changes, save the file and restart the SSH service:
sudo systemctl restart ssh
And just like that, your SSH server is now more secure than ever!
Connecting IoT Devices Using SSH
Alright, let’s talk about the real star of the show—connecting IoT devices using SSH. This is where the magic happens, and where securely connect remote IoT P2P SSH Ubuntu becomes a reality. Here’s how you can do it:
Step 1: Set Up Public Key Authentication
Public key authentication is a fancy way of saying you’ll use a key pair to log in to your IoT devices instead of a password. Here’s how you can set it up:
- Generate a key pair on your local machine using the following command:
ssh-keygen -t rsa -b 4096
- Copy the public key to your IoT device using the ssh-copy-id command:
ssh-copy-id user@iot-device-ip
Now, when you connect to your IoT device, you’ll be prompted to enter the passphrase for your private key instead of a password. Much more secure, right?
Step 2: Test the Connection
Once you’ve set up public key authentication, it’s time to test the connection. Open up your terminal and type:
ssh user@iot-device-ip
If everything is set up correctly, you should be able to log in without entering a password. If you’re prompted for a password, double-check your SSH configuration and make sure public key authentication is enabled.
Best Practices for Secure IoT Connections
Now that you’ve got the basics down, let’s talk about some best practices for ensuring your IoT connections remain secure. These tips might seem obvious, but they can make a world of difference when it comes to protecting your network.
1. Keep Your Software Up to Date
One of the easiest ways to keep your IoT devices secure is to ensure all your software is up to date. This includes your operating system, SSH server, and any other applications running on your devices. Regular updates not only add new features but also patch security vulnerabilities that could be exploited by hackers.
2. Use Strong Passwords
Even if you’re using public key authentication, it’s still a good idea to use strong passwords for your accounts. A strong password should be at least 12 characters long and include a mix of uppercase and lowercase letters, numbers, and symbols. Avoid using common words or phrases, and never reuse passwords across multiple accounts.
3. Monitor Your Network
Finally, don’t forget to monitor your network for any suspicious activity. Set up logging on your SSH server and review the logs regularly to ensure there are no unauthorized login attempts. If you notice anything unusual, take action immediately to prevent potential security breaches.
Advanced Techniques for Securing IoT Devices
If you’re looking to take your IoT security to the next level, there are a few advanced techniques you can try. These methods require a bit more technical expertise, but they can significantly enhance the security of your network.
1. Use a Firewall
A firewall is like a digital gatekeeper that controls who can access your network. By setting up a firewall on your Ubuntu machine, you can block unauthorized access to your SSH service and protect your IoT devices from potential threats.
2. Implement Two-Factor Authentication
Two-factor authentication adds an extra layer of security by requiring users to provide two forms of identification before gaining access to your network. This could be something you know (like a password) and something you have (like a mobile device). While it might seem like overkill, two-factor authentication can make it nearly impossible for hackers to gain access to your system.
3. Use a VPN
A VPN, or Virtual Private Network, encrypts all communication between your devices, making it much harder for hackers to intercept your data. By setting up a VPN on your network, you can ensure that all traffic between your IoT devices remains secure, no matter where they are in the world.
Real-World Applications of IoT and SSH
Now that we’ve covered the technical stuff, let’s talk about some real-world applications of securely connect remote IoT P2P SSH Ubuntu. These examples will give you a better understanding of how this technology is being used in the real world and inspire you to come up with your own ideas.
1. Smart Home Automation
One of the most popular applications of IoT and SSH is in smart home automation. By connecting your home devices to a central hub and securing them with SSH, you can control everything from your lights to your thermostat from anywhere in the world. Not only is this convenient, but it also helps you save energy and reduce your carbon footprint.
2. Industrial IoT
In the industrial sector, IoT and SSH are being used to monitor and control complex machinery and processes. By securely connecting sensors and devices to a central system, companies can gather valuable data and make informed decisions that improve efficiency and reduce costs.
3. Healthcare
Finally, IoT and SSH are revolutionizing the healthcare industry by enabling remote patient monitoring and telemedicine. By securely connecting medical devices to a central system, doctors can monitor patients in real-time and provide timely interventions that improve outcomes and save lives.
Conclusion
Well, there you have it—everything you need to know about securely connect remote IoT P2P SSH Ubuntu. From setting up SSH on Ubuntu to connecting IoT devices and implementing advanced security techniques, this guide has covered it all. Remember, securing your IoT devices isn’t just a nice-to-have; it’s a must-have in today’s digital landscape.
So, what are you waiting for? Take action today by implementing the tips and tricks we’ve discussed and make sure your network remains safe and secure. And don’t forget to share this article with your friends and colleagues so they can benefit from it too. Together, we can create a safer, more connected world!
Table of Contents
- Understanding the Basics of IoT and SSH
- Setting Up SSH on Ubuntu: A Step-by-Step Guide
- Connecting IoT Devices Using SSH
- Best Practices for Secure IoT Connections
- Advanced Techniques for Securing IoT Devices
- Real-World Applications of IoT and SSH
- Unveiling The Truth About Diva Flawless Beyond The Videos
- Subhashree Sahu Xxx Debunking Myths And Exploring The Truth
The Ultimate Tutorial Enabling SSH on Ubuntu Made Easy

How to Enable SSH on Ubuntu 20.04 All Things How

How to Connect ssh in ubuntu linux. Lets begin
