Mastering RemoteIoT Web SSH On Raspberry Pi: The Ultimate Guide For 2024
Listen up, tech enthusiasts! If you're diving into the world of remote IoT management and web SSH on Raspberry Pi, you're about to uncover a goldmine of knowledge. This guide is your one-stop-shop for mastering remote IoT connections using web SSH on Raspberry Pi. Whether you're a hobbyist, developer, or professional, this article will take you from zero to hero. Let’s get started, shall we?
In today’s fast-paced digital era, managing devices remotely has become essential. And when it comes to remote IoT, Raspberry Pi stands out as a powerhouse. With web SSH, you can control your Pi from anywhere in the world. It’s like having a superpower at your fingertips. But how exactly do you set it up? Don’t worry; we’ve got you covered.
RemoteIoT web SSH on Raspberry Pi isn’t just a buzzword anymore—it’s a necessity. As more people embrace smart homes, automation, and IoT projects, understanding this setup becomes crucial. This guide will walk you through everything you need to know, step by step, making sure you’re not left in the dark. Ready? Let’s go!
- Jasi Bae Naked The Truth Behind The Viral Sensation Youve Been Missing
- Jameliz Benitez Smith The Rising Star Whos Taking The World By Storm
What is RemoteIoT Web SSH on Raspberry Pi?
RemoteIoT web SSH on Raspberry Pi is essentially a way to access and control your Raspberry Pi remotely over the internet using SSH (Secure Shell) through a web interface. Imagine being able to log into your Pi from your laptop, phone, or tablet, no matter where you are. Sounds cool, right? Well, it is!
SSH itself is a protocol that allows secure communication between devices. When combined with a web-based interface, it opens up endless possibilities for remote management. Whether you're monitoring sensors, controlling actuators, or running scripts, you can do it all without being physically present.
For instance, if you're managing a weather station or a home automation system, remote IoT web SSH ensures you can check data, update software, or troubleshoot issues anytime, anywhere. It’s like having a remote control for your projects, but way cooler.
- Abby Berner Leak The Untold Story Behind The Viral Sensation
- Vega Thompson Onlyfans The Rising Star In The Digital Spotlight
Why Use Raspberry Pi for RemoteIoT Web SSH?
Now, you might be wondering, why Raspberry Pi? Well, here’s the deal: Raspberry Pi is compact, affordable, and incredibly versatile. It’s designed to be the perfect platform for IoT projects, and its compatibility with SSH makes it a no-brainer for remote access.
Here are a few reasons why Raspberry Pi is ideal for remote IoT web SSH:
- Low power consumption: Your Pi can run 24/7 without breaking the bank on electricity.
- Wide community support: With tons of tutorials and forums, you’ll never run out of help.
- Customizability: From sensors to cameras, you can integrate almost anything with your Pi.
- Security: With proper configuration, SSH on Raspberry Pi is as secure as it gets.
Plus, Raspberry Pi’s compatibility with various operating systems and programming languages makes it a dream for developers. Whether you’re coding in Python, Node.js, or even Bash scripts, your Pi can handle it all.
Setting Up SSH on Raspberry Pi
Enabling SSH on Your Pi
Before diving into web SSH, you need to enable SSH on your Raspberry Pi. Don’t panic—it’s super easy. Here’s how:
- Boot up your Raspberry Pi and log in.
- Open the terminal (you know, that black screen with green text).
- Type
sudo raspi-configand hit Enter. - Navigate to "Interfacing Options" and select "SSH".
- Choose "Yes" to enable SSH and you’re done!
That’s it. SSH is now active on your Pi. But wait, there’s more! To make things even smoother, you’ll want to set up a static IP address so your Pi always connects to the same address.
Configuring a Static IP Address
Having a static IP ensures your Pi’s address doesn’t change, which is crucial for remote access. Here’s how to set it up:
- Open the terminal and type
sudo nano /etc/dhcpcd.conf. - Scroll to the bottom and add the following lines:
interface eth0
 static ip_address=192.168.1.100/24
 static routers=192.168.1.1
 static domain_name_servers=192.168.1.1
Replace the IP addresses with your network settings. Save and exit by pressing Ctrl + X, then Y, and Enter. Reboot your Pi with sudo reboot, and you’re good to go!
Connecting Your Pi to the Internet
For remote IoT web SSH to work, your Pi needs an internet connection. Whether you’re using Ethernet or Wi-Fi, here’s how to ensure your Pi stays online:
- Ethernet: Simply plug in an Ethernet cable, and you’re connected. Easy peasy.
- Wi-Fi: If your Pi has built-in Wi-Fi, you can connect by editing the
wpa_supplicant.conffile. Add your network details and reboot.
Once your Pi is online, you can test the connection by pinging a website. Type ping google.com in the terminal. If you see replies, you’re all set!
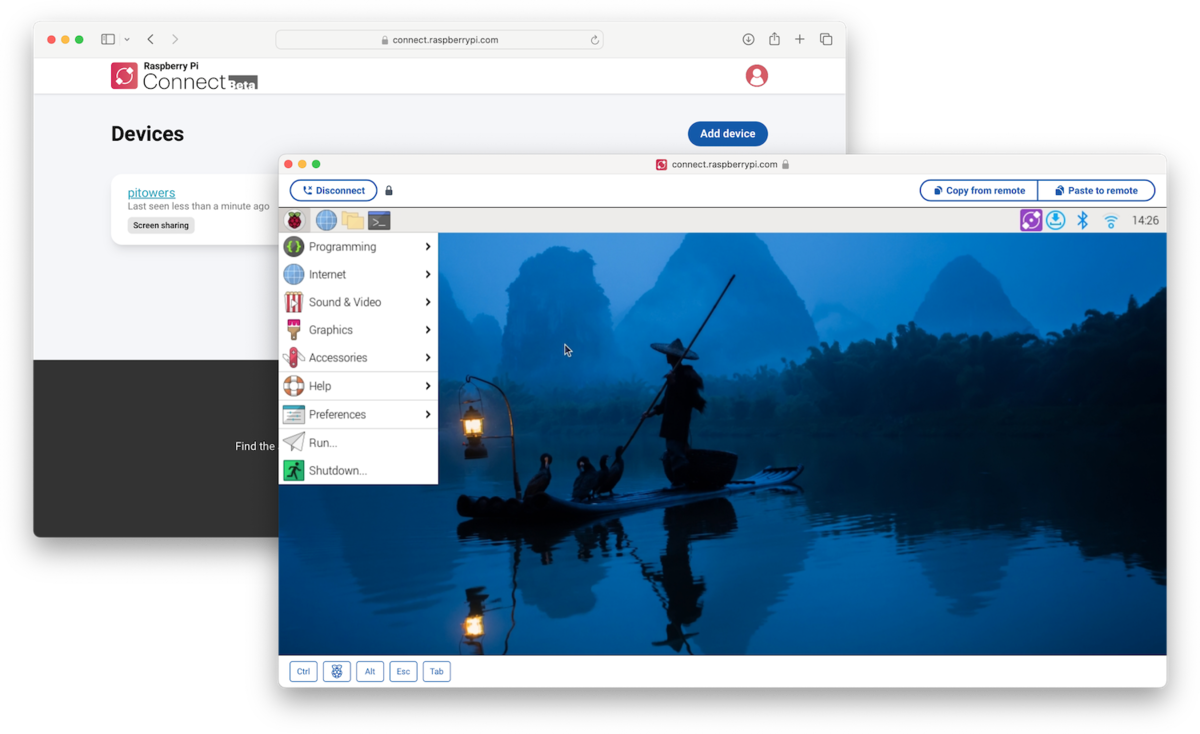
Introducing Web SSH for RemoteIoT
What is Web SSH?
Web SSH is a browser-based interface that lets you access your Raspberry Pi’s terminal through any web browser. No need for additional software or apps—just open your browser and connect. It’s like having a portable terminal in your pocket.
One of the most popular tools for web SSH is WebSSH2. It’s lightweight, secure, and works seamlessly with Raspberry Pi. Let’s see how to set it up.
Installing WebSSH2 on Raspberry Pi
Installing WebSSH2 is a breeze. Follow these steps:
- Update your Pi’s package list:
sudo apt update && sudo apt upgrade. - Install Node.js:
sudo apt install nodejs. - Install npm:
sudo apt install npm. - Clone the WebSSH2 repository:
git clone https://github.com/jc21/webssh2.git. - Install dependencies:
cd webssh2 && npm install. - Run WebSSH2:
npm start.
Now, open your browser and go to http://your-pi-ip:3000. You’ll see the WebSSH2 interface, where you can connect to your Pi using SSH credentials.
Securing Your RemoteIoT Web SSH Connection
Security is paramount when it comes to remote access. Here’s how to fortify your setup:
- Change the default SSH port: Instead of using port 22, switch to a higher port number like 2222. This makes brute-force attacks harder.
- Use strong passwords: Avoid using "password123" or anything easily guessable. Consider enabling two-factor authentication (2FA).
- Enable SSH keys: SSH keys provide a more secure alternative to passwords. Generate a key pair and add the public key to your Pi’s authorized_keys file.
- Firewall protection: Use tools like UFW (Uncomplicated Firewall) to block unwanted traffic and allow only necessary ports.
Remember, security is an ongoing process. Regularly update your Pi’s software and monitor for suspicious activity.
Exploring Use Cases for RemoteIoT Web SSH
So, what can you actually do with remote IoT web SSH on Raspberry Pi? The possibilities are endless. Here are a few examples:
- Home automation: Control smart lights, thermostats, and security systems from anywhere.
- Weather monitoring: Set up a weather station and access real-time data remotely.
- Security cameras: Stream live footage and manage camera settings without being present.
- Server management: Use your Pi as a lightweight server and manage it remotely.
Each use case highlights the versatility of Raspberry Pi and the power of web SSH. Whether you’re a DIY enthusiast or a professional developer, there’s something for everyone.
Troubleshooting Common Issues
Even the best setups can face hiccups. Here are some common issues and how to fix them:
- Can’t connect to SSH: Double-check your IP address and ensure SSH is enabled. Also, verify that your firewall isn’t blocking the connection.
- WebSSH2 not loading: Make sure Node.js and npm are installed correctly. Restart the WebSSH2 service if needed.
- Slow connection: Optimize your network settings and consider using a wired connection instead of Wi-Fi.
If all else fails, consult the official Raspberry Pi forums or the WebSSH2 GitHub page for additional support.
Best Practices for RemoteIoT Web SSH
To make the most of your setup, follow these best practices:
- Regularly back up your Pi’s data to prevent loss in case of hardware failure.
- Keep your software updated to ensure compatibility and security.
- Document your setup process for future reference.
- Experiment with different tools and configurations to find what works best for you.
By adhering to these practices, you’ll ensure a smooth and efficient remote IoT experience.
Conclusion: Take Action Today
And there you have it, folks—a comprehensive guide to mastering remote IoT web SSH on Raspberry Pi. From setting up SSH to securing your connection, we’ve covered it all. Now it’s your turn to take action. Whether you’re building a smart home or managing a server, this setup will empower you to achieve great things.
So, what are you waiting for? Dive in, experiment, and let us know how it goes. Feel free to leave a comment below or share this article with your tech-savvy friends. Together, let’s push the boundaries of what’s possible with Raspberry Pi and remote IoT!
- Lara Rose Leak The Untold Story Behind The Viral Sensation
- Browse Kid And His Mom Video Original A Deep Dive Into The Phenomenon

Programming Raspberry Pi Remotely using VS Code (RemoteSSH) Random
Raspberry Pi Connect launches, remote controls your Pi via web browser

How to SSH into Raspberry Pi for Remote Access
