Mastering Remote SSH Into Raspberry Pi Behind NAT Router On Mac
Hey there, tech enthusiasts! Are you ready to dive into the world of remote access? Today, we're talking about something that's both powerful and practical: remote SSH into Raspberry Pi behind NAT router Mac. If you're a fan of tinkering with Raspberry Pi or managing remote systems, this guide is your golden ticket. Whether you're a seasoned pro or just starting out, understanding how to remotely connect to your Raspberry Pi can save you tons of time and effort. So, buckle up and let's get started!
Now, you might be wondering why this topic matters so much. Imagine being able to control your Raspberry Pi from anywhere in the world—all you need is an internet connection and a Mac. That's the magic of SSH (Secure Shell). It's not just about convenience; it's about having full control over your projects, even when you're miles away. Whether you're setting up a home server, running a media center, or managing IoT devices, SSH is your best friend.
Before we jump into the nitty-gritty, let me assure you that this guide is packed with actionable tips, step-by-step instructions, and expert advice. We'll cover everything from basic concepts to advanced troubleshooting, ensuring you have all the tools you need to succeed. So, whether you're a Mac user looking to expand your skillset or a Raspberry Pi enthusiast eager to unlock new possibilities, this article has got you covered. Let's make it happen!
- Jameliz Benitez The Truth Behind The Controversial Search Term
- Savannah Demers Nude Unveiling The Truth Behind The Controversy
Table of Contents
- Introduction to Remote SSH
- Raspberry Pi Setup for SSH
- Understanding NAT Router Considerations
- Using Mac's Built-in SSH Client
- Setting Up Port Forwarding
- Dynamic DNS for Easy Access
- Securing Connections with SSH Keys
- Troubleshooting Common Issues
- Advanced Techniques for Remote Access
- Conclusion and Next Steps
Introduction to Remote SSH
Alright, let's start with the basics. SSH, or Secure Shell, is a protocol that allows you to securely connect to remote devices over a network. It's like a secret tunnel that lets you communicate with your Raspberry Pi without exposing sensitive information. When it comes to remote SSH into Raspberry Pi behind NAT router Mac, the key challenge lies in navigating the complexities of NAT (Network Address Translation) routers.
NAT routers are like bouncers at a club—they control who gets in and out. They're great for protecting your home network, but they can also make it tricky to access devices from outside your local network. That's where port forwarding and dynamic DNS come into play. These tools help you bypass the NAT router's restrictions and establish a stable connection to your Raspberry Pi.
- Nikita Kinka Rising Star In The Spotlight
- Pierre Poilievre Height And Weight A Closer Look At The Canadian Politician
For Mac users, the good news is that macOS comes with a built-in SSH client. This means you don't need to install any additional software to get started. All you need is a terminal window and a few commands, and you're good to go. So, whether you're a beginner or a pro, this guide will walk you through the process step by step.
Raspberry Pi Setup for SSH
Enabling SSH on Your Raspberry Pi
First things first, you need to enable SSH on your Raspberry Pi. This is super easy, especially if you're using Raspberry Pi OS. Here's what you need to do:
- Boot up your Raspberry Pi and log in.
- Open the terminal and type
sudo raspi-config. - Navigate to "Interfacing Options" and select "SSH".
- Choose "Enable" and exit the configuration tool.
- Reboot your Raspberry Pi to apply the changes.
Once SSH is enabled, you can test the connection locally by typing ssh pi@raspberrypi.local in your Mac's terminal. If everything is set up correctly, you should be able to log in using the default credentials (username: pi, password: raspberry).
Updating Your Raspberry Pi
Before diving into remote access, it's always a good idea to update your Raspberry Pi. This ensures you're running the latest software and security patches. To update your system, run the following commands:
sudo apt updatesudo apt upgrade
These commands will fetch the latest updates and install them on your Raspberry Pi. It might take a few minutes, depending on your internet speed, but it's worth the wait.
Understanding NAT Router Considerations
Now, let's talk about NAT routers. These devices are essential for managing internet traffic in most home networks. They assign local IP addresses to devices and translate them to a single public IP address when accessing the internet. While this setup is great for security, it can complicate remote access.
When you try to connect to your Raspberry Pi from outside your local network, the NAT router doesn't know which device to forward the connection to. That's why we need to configure port forwarding. Port forwarding tells the router which internal device should handle incoming requests on a specific port.
Here's a quick breakdown of how NAT routers work:
- Public IP Address: The IP address your router uses to communicate with the internet.
- Private IP Address: The IP address assigned to your Raspberry Pi within your local network.
- Ports: Virtual channels that allow different types of data to flow through your router.
By setting up port forwarding, you can direct SSH traffic (usually on port 22) to your Raspberry Pi's private IP address. This creates a seamless connection between your Mac and your Raspberry Pi, even when they're on different networks.
Using Mac's Built-in SSH Client
One of the coolest things about macOS is that it comes with a built-in SSH client. This means you don't need to install any extra software to connect to your Raspberry Pi. All you need is the Terminal app, which you can find in Applications > Utilities.
Here's how to use the SSH client:
- Open the Terminal app on your Mac.
- Type
ssh username@ip_address, replacing "username" with your Raspberry Pi's username and "ip_address" with its local or public IP address. - Enter your password when prompted.
That's it! You're now connected to your Raspberry Pi. From here, you can run commands, transfer files, and manage your system as if you were sitting right in front of it.
Setting Up Port Forwarding
Accessing Your Router's Settings
To set up port forwarding, you'll need to access your router's settings page. This process varies depending on your router model, but most routers use a web-based interface. Here's how to do it:
- Open a web browser on your Mac.
- Enter your router's IP address in the address bar (usually 192.168.0.1 or 192.168.1.1).
- Log in using your router's admin credentials.
Once you're logged in, look for a section called "Port Forwarding" or "Virtual Servers". This is where you'll configure the rules for forwarding SSH traffic to your Raspberry Pi.
Configuring Port Forwarding Rules
Here's how to set up port forwarding for SSH:
- Create a new rule and name it something like "SSH Pi".
- Set the external port to 22 (or a different port if you want to use a non-standard one).
- Set the internal port to 22 as well.
- Enter your Raspberry Pi's private IP address in the "Internal IP Address" field.
- Save the rule and restart your router if necessary.
With port forwarding set up, your router will now direct incoming SSH traffic to your Raspberry Pi. It's like giving your Raspberry Pi a direct line to the outside world.
Dynamic DNS for Easy Access
Here's a pro tip: use dynamic DNS (DDNS) to simplify remote access. DDNS assigns a domain name to your public IP address, making it easier to remember and access. Plus, it automatically updates when your IP address changes, which is common with most home internet providers.
There are several DDNS services available, such as No-IP, Dyn, and DuckDNS. Most of these services offer free plans that are perfect for personal use. Here's how to set it up:
- Sign up for a DDNS service and create a domain name.
- Install the DDNS client software on your Raspberry Pi or router.
- Configure the client to update your domain name with your current IP address.
Once DDNS is set up, you can connect to your Raspberry Pi using a domain name instead of an IP address. This makes the process much more user-friendly and reliable.
Securing Connections with SSH Keys
While passwords are convenient, they're not the most secure way to authenticate SSH connections. That's why we recommend using SSH keys. SSH keys are like digital passports that allow you to log in without entering a password every time.
Here's how to generate and use SSH keys:
- On your Mac, open the Terminal app and type
ssh-keygen. - Follow the prompts to create a new key pair (you can leave the passphrase blank if you prefer).
- Copy the public key to your Raspberry Pi by running
ssh-copy-id pi@your_pi_address. - Test the connection by typing
ssh pi@your_pi_address. You should be able to log in without entering a password.
Using SSH keys not only enhances security but also saves you time. It's a win-win situation!
Troubleshooting Common Issues
Even with the best setup, things can go wrong sometimes. Here are some common issues you might encounter and how to fix them:
- Connection Refused: Double-check your port forwarding rules and ensure SSH is enabled on your Raspberry Pi.
- Timeout Errors: Verify your Raspberry Pi's IP address and make sure your router's firewall isn't blocking the connection.
- Authentication Failed: Ensure you're using the correct username and password, or check your SSH key configuration.
If you're still having trouble, try resetting your router or rebooting your Raspberry Pi. Sometimes, a simple restart can resolve connectivity issues.
Advanced Techniques for Remote Access
Using SSH Tunnels
SSH tunnels are a powerful tool for securing sensitive data. They allow you to create encrypted connections between your Mac and Raspberry Pi, ensuring that your data remains private and secure. Here's how to set up an SSH tunnel:
- Open the Terminal app on your Mac.
- Type
ssh -L local_port:destination_host:destination_port username@your_pi_address. - Replace "local_port", "destination_host", and "destination_port" with the appropriate values for your setup.
With an SSH tunnel in place, you can securely access web services, databases, or other resources running on your Raspberry Pi.
Automating SSH Connections
For frequent users, automating SSH connections can save a lot of time. You can create a script that connects to your Raspberry Pi with a single command. Here's an example:
- Create a new file called
connect_pi.shin your home directory. - Add the following line to the file:
ssh pi@your_pi_address. - Make the file executable by running
chmod +x connect_pi.sh.
Now, you can connect to your Raspberry Pi
- Anjali Arora Mms Video The Untold Story And Facts You Need To Know
- Sadie Mckenna Nude Unveiling The Truth And Setting The Record Straight
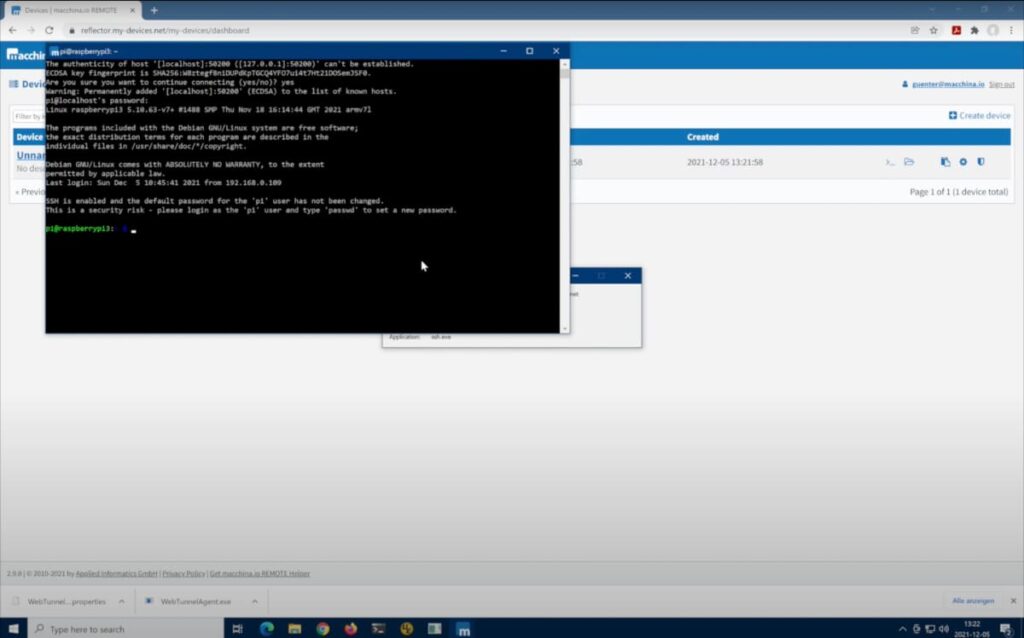
Video Getting Started with macchina.io REMOTE SSH into a remote

How to SSH Into a Raspberry Pi for Remote Access

How to SSH Into a Raspberry Pi for Remote Access
